
Patterns are replicas of the casting products with exact standards. What is a pattern in metal casting and how to make it? Today we’ll also go over the types of casting patterns.
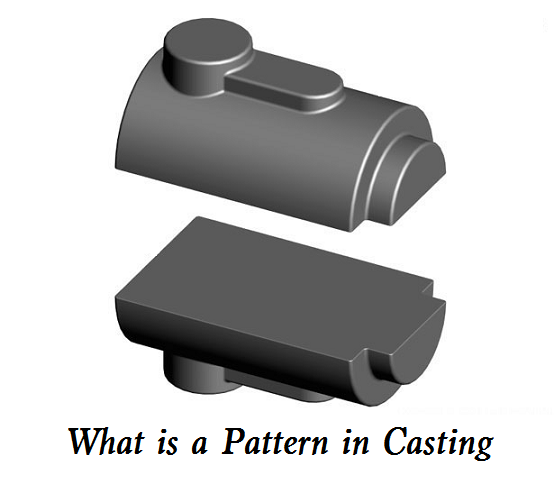
What is a Pattern in Casting?
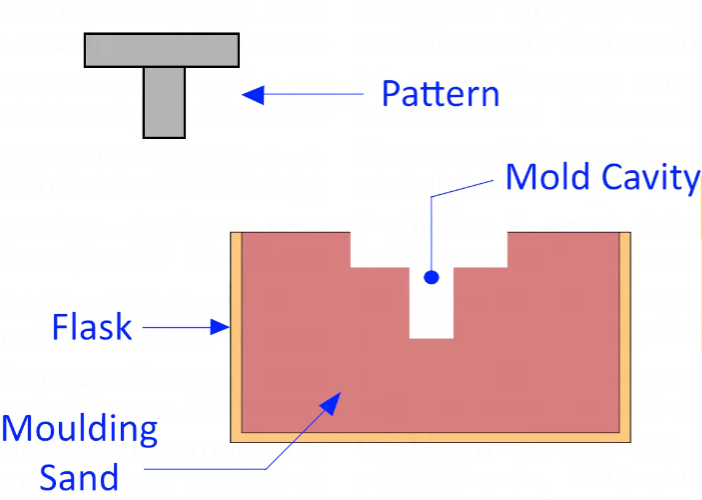
In casting, a pattern is a replica of the final product that is used to create a mold. The pattern is typically made of wood, metal, plastic, or other materials, and is used to create a negative impression in the mold material, which is then used to cast the final product. The pattern determines the shape and dimensions of the final product. The quality of the pattern directly affects the quality of the final product, so it is important to ensure that the pattern is accurate and free from defects.
The pattern is typically made to the exact size, shape, and configuration of the final product, and is used to create a mold cavity that will produce the desired shape and dimensions of the final product. The pattern may be created manually by skilled craftsmen, or it may be created using computer-aided design (CAD) software and 3D printing technology. Once the pattern is created, it is used to make a mold by packing sand or other mold material around it. The pattern is then removed from the mold, leaving a negative impression on the mold material. Molten metal is then poured into the mold to create the final product. The mold material is then broken away from the final product, leaving a finished casting.
Types of Patterns in Metal Casting and Their Uses
There are several types of patterns used in metal casting, each with its own specific purpose and use. Here are some common types of patterns and their uses:
-
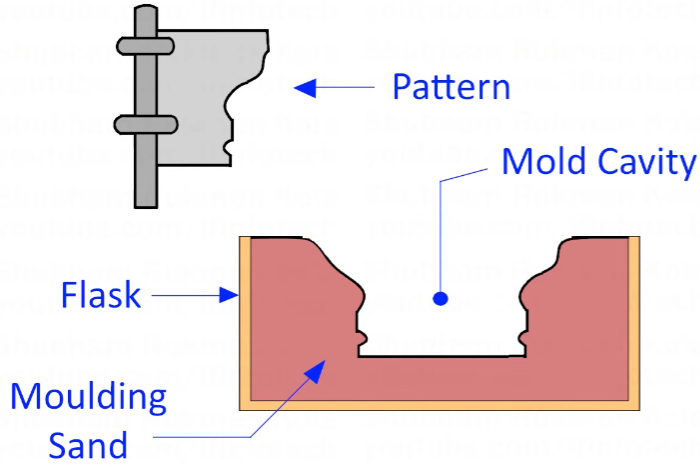
Single-piece Pattern
A single-piece pattern in casting is the simplest pattern that is used to create a single cavity mold, typically used for straightforward objects. These are made in a single piece and can be placed either in the cope or drag depending on the simplicity of the operation. It is typically made from wood, plastic, or metal and is designed to be used for low to medium production volumes. This type is commonly used to cast items like the stuffing box of steam engines, where the design is uncomplicated and easy to remove from the mold.
-
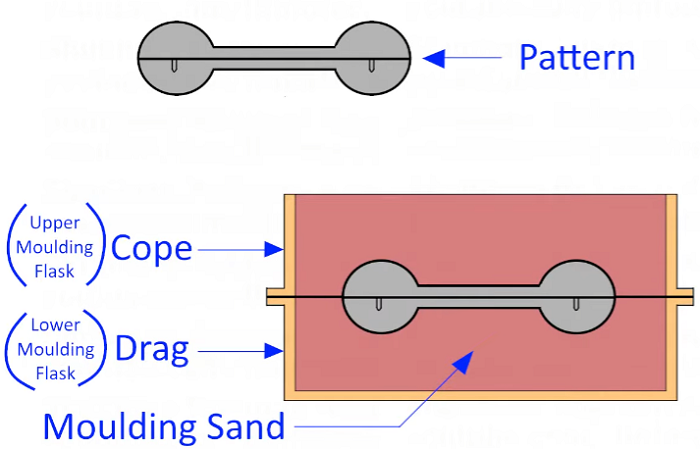
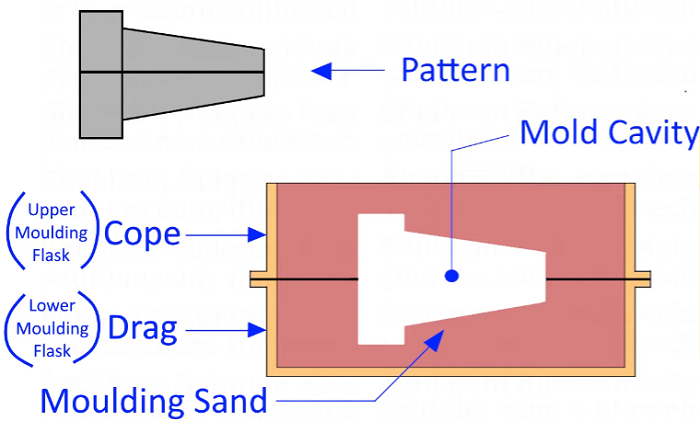
Split Pattern (Two Piece Pattern)
Split pattern in casting, also known as a split pattern, is divided into two or more halves (one half is molded in the drag and the other in the cope) that can be separated to create a multiple cavity mold. The cope part is equipped with dowel pins to ensure proper alignment of the two halves, with corresponding holes in the drag half. It is often used for high-volume production of small to medium-sized parts. This type of pattern is widely used for components such as steam valves, where more complex shapes are required and removal of the pattern from the mold needs to be straightforward.
-
Match Plate Pattern
The match plate pattern in casting is a two-piece pattern that is mounted on a plate, so it is a variation of the split pattern. The plate is used to create a two-part mold that can be separated to remove the casting. It is commonly used for high-volume production of small to medium-sized parts. Match plate patterns are commonly used in the mass production of parts such as piston rings for internal combustion engines, providing efficiency and consistency.

-
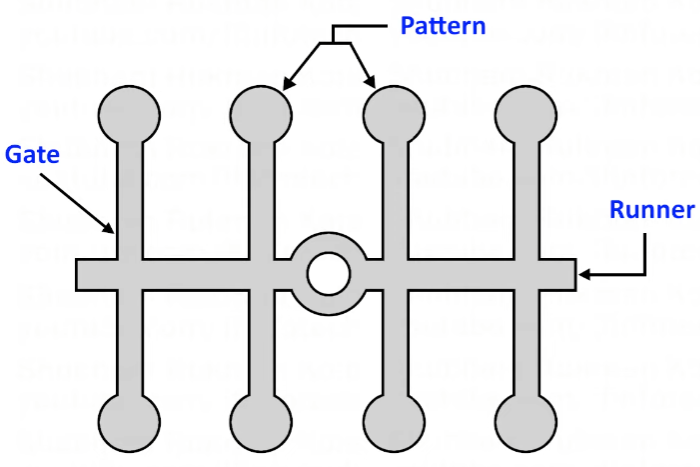
Gated Pattern
The gated pattern in casting is a pattern that includes a gate, runner, and sprue system. The gate, runner, and sprue system is used to direct molten metal into the mold cavity. It is often used for larger castings and complex shapes. While these patterns are costly, they are efficient for creating small castings such as corner brackets, especially in mass production scenarios and molding machines.
-
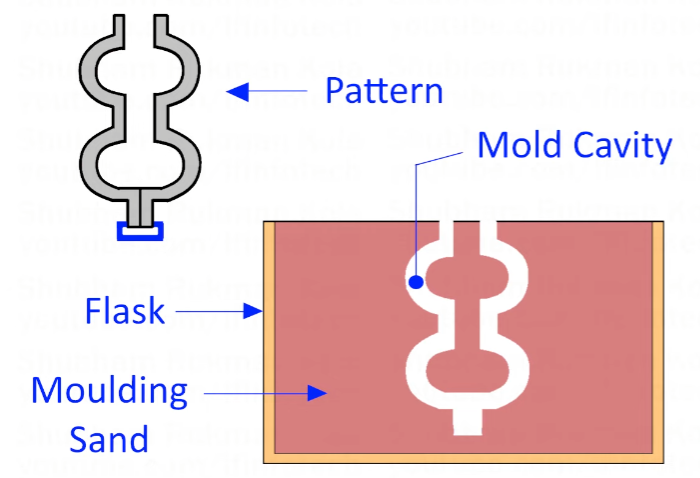
Skeleton Pattern
The skeleton pattern in casting is a pattern that is made from metal or plastic. It consists of a series of interconnected rods and is used to create intricate internal cavities. This pattern is suitable for producing large, simple castings quickly, particularly for items like circular discs and wheels. This approach saves both time and material, acting as a guide for hand-shaping the mold. Skeleton patterns are commonly employed in pit or floor molding, such as in the manufacture of turbines and everyday items like water pipes.

-
Sweep Pattern
The sweep pattern in casting is a pattern that is used to create a curved surface on a casting and involves a board or section of proper contour that is rotated about one edge to shape mold cavities with rotational symmetry. It is typically made from wood and is used for low to medium production volumes. This pattern is suitable for producing large castings quickly, particularly for items like circular discs and wheels. The sweep pattern offers a practical way to create large, symmetrical shapes without constructing a full pattern for each casting.
-
Cope and Drag Pattern
The cope and drag pattern in casting is a pattern that is used to create a two-part mold, which is a split pattern where the cope and drag portions are mounted on separate match plates. The cope is the top half of the mold, while the drag is the bottom half. Cope and drag patterns are similar to two-piece patterns but are specifically used for making large castings where the molds are heavy and difficult to handle. The pattern is typically made from wood and is used for low to medium production volumes. This type finds use in the construction of large components like flange pipes and water jackets, which are vital parts in heavy machinery.
-
Loose Piece Pattern
Loose piece patterns are employed when the removal of the pattern from the mold is difficult due to extended surfaces in the upper or lower half. In this design, the extended part is made as a loose piece that can be removed separately before extracting the main pattern, allowing for easy removal without damaging the mold cavity. These patterns are used in the production of parts like axle pins and rotor hubs.

-
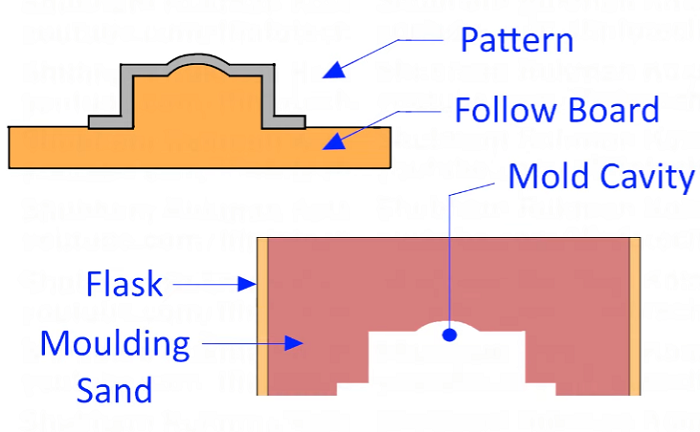
Follow Board Pattern
A follow board pattern utilizes a wooden board as a base to support the pattern during molding. This board helps maintain the correct shape and stability of the pattern, making it particularly useful for casting master patterns that serve many purposes.
-
Segmental Pattern
Segmental patterns operate much like sweep patterns but in the form of segments rather than a complete rotation. These are used for molding circular or rounded structures, such as wheels, rims, and pulleys, where only part of the pattern is rotated to create the desired mold shape.

-
Shell Pattern
Shell patterns are designed for creating hollow-shaped structures. The process involves parting the pattern along the center, and the resultant halves are doweled to ensure proper alignment. This type of pattern is especially useful for producing castings that require a hollow core.
-
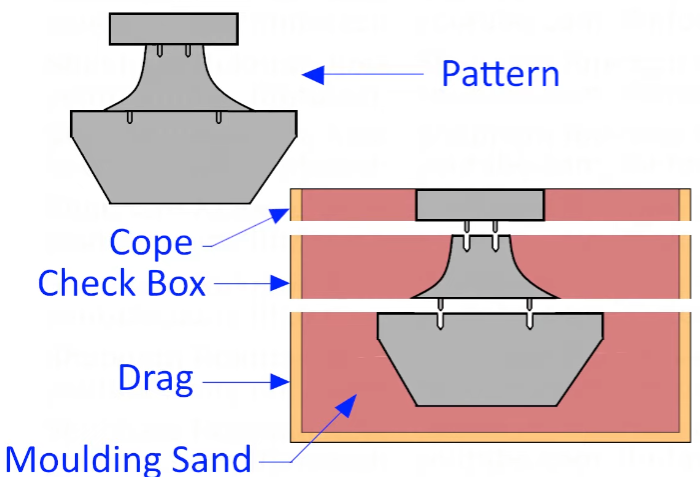
Multi Piece Pattern
For castings with very intricate and challenging designs, multi piece patterns are used. These comprise three or more sections, usually consisting of top, bottom, and middle parts—where the bottom is the drag, the top is the cope, and the middle section is called the check box. Multi piece patterns are often utilized in manufacturing various kinds of joints, such as mitre joints and dowel joints, where complexity requires additional pattern sections for accurate molding.
-
Matchplate Flask
The matchplate flask is a reusable mold-making flask that typically uses a match plate pattern. The flask consists of two halves that can be separated to remove the casting. It is commonly used for high-volume production of small to medium-sized parts.
Pattern Making in Casting Process
Creating a casting pattern for foundry work is a process that combines practical skill, material knowledge, and an understanding of the molding process. Below, we cover the basics of pattern making, including material selection, design principles, and practical tips to help you produce patterns that work well in the foundry.
How to Make a Casting Pattern for Foundry?
1) Determine the pattern material: The first step is to determine the best material to use for the pattern. Common materials include wood, plastic, and metal. The material should be durable and easy to work with.
2) Create a drawing or model: The next step is to create a drawing or model of the final product, either manually or using computer-aided design (CAD) software. This will serve as the basis for the pattern.
3) Design the pattern: Using the drawing or model, design the pattern by adding material for shrinkage and machining allowances, as well as features such as draft angles and fillets. The pattern should be designed to ensure that it can be easily removed from the mold.
4) Create the pattern: Using the design, create the pattern using the chosen material. This may involve cutting, shaping, or machining the material to create the desired shape and dimensions.
5) Finish the pattern: Once the pattern is created, it may need to be sanded or finished to ensure that it is smooth and free from defects.
6) Test the pattern: Before using the pattern to create a mold, it is important to test it to ensure that it accurately reflects the final product. This may involve creating a test casting or using 3D scanning technology to compare the pattern to the original model.
7) Store the pattern: Once the pattern has been tested and approved, it should be stored in a safe and secure location for future use.
Pattern Material in Casting
The material for a pattern must be strong enough to withstand the sand ramming process without being damaged. Traditionally, patterns were made from wood, especially for original patterns. Mahogany has been a favored wood because it is easy to work, stable, and durable. Cherry was also commonly used. For one-off patterns, woods like pine or maple may be used, provided they have a close grain to avoid raised grain that can make pattern extraction difficult.
Modern patterns are often produced using 3D CAD modeling, then 3D printed or machined from plastics, aluminum, or specialized pattern board materials. The key is to use a material that will hold up during the molding process and remain dimensionally stable. Very soft materials, such as styrofoam, are not recommended for reusable patterns as they tend to be damaged during ramming.
Basic Pattern Design Principles
1. Draft
Always include draft in your pattern design. Draft is a slight taper (typically 1-2 degrees) on surfaces that will be pulled from the sand. This ensures the pattern can be removed easily from the mold without damaging the sand cavity. If the pattern is wider at the bottom than at the top, it will be impossible to remove without breaking the mold. Even thin patterns should have draft applied to all sides.
2. Radiused Corners and Fillets
All corners on a pattern should be rounded rather than sharp. Inside corners should have fillets—a radius that helps the pattern pull from the sand more easily and prevents weak spots in the casting. Sharp corners cool faster during casting, which can cause defects or failure points. An eighth-inch radius is recommended for most fillets, but larger radii are preferable when possible. Fillets can be formed with filler materials such as Bondo, leather inserts, or wax, and shaped using fillet tools.
3. Smooth Surfaces
The surface of the pattern must be extremely smooth. Any imperfections on the pattern will transfer to the mold, making extraction difficult and potentially damaging both the pattern and the mold. Patterns made by 3D printing often require additional finishing—primer, sanding, and sometimes filler—to achieve the desired smoothness.
Pattern Allowances
1. Shrinkage Allowance
Metals shrink as they cool and solidify, so patterns must be made slightly oversized to compensate. Different materials have different shrinkage rates. For example, cast iron typically requires about a 1% allowance (1/8 inch per foot), brass about 1.5%, and aluminum around 1.25-1.3%. Traditional pattern makers used shrink rules—special rulers with the shrinkage allowance built in—to lay out patterns. In digital design, the part can be scaled up by the appropriate factor before printing or machining. Consult your foundry for the exact shrinkage rate for the alloy being used.
2. Machining Allowance
If the final casting will be machined, extra material must be added to those surfaces. A good rule is to add about 1/8 inch of material to areas that will be machined so the finished part can be brought to exact dimensions after casting. Larger castings may require more allowance.
Communication with the foundry is important before sending your pattern for casting. Show your design to the foundry and ask for their input. They may suggest changes to make molding easier or improve casting quality. Sharing sketches or photos for feedback helps avoid issues down the line and saves time and costs.