
How Do You Clean Die Casting Mould | Step By Step Guide
At present, the cleaning of frame and mold parts requires much more time than all other maintenance operations (disassembly, commissioning or assembly). On the one hand, it is the key to improve the reliability of molds and ensure product quality. On the other hand, most molds are cleaned by hand. In this article, we are going to talk about die casting mold cleaning, we present specific steps for cleaning die casting mould.
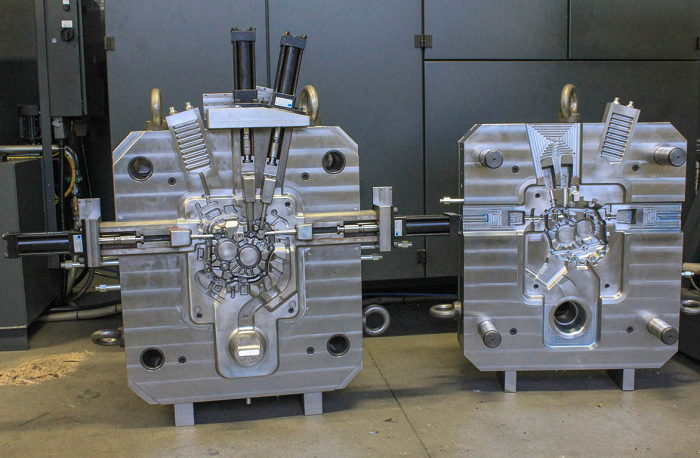
Die Casting Mould Cleaning Culture
Mold cleaning is not only an important process in mold maintenance, but also a bottleneck restricting mold maintenance. Part of. Mold manufacturing and development is much faster than mold cleaning. After rapid cleaning, the mold can be prepared for the next production, so the time required for mold cleaning is quite limited. Through the investigation of the factory, we know that the corridors in the factory and the molds configured in the workplace basically occupy the limited working space in the workplace.
The company readjusts the mould immediately after the completion of the production without cleaning process and continues to use it for regeneration. If the manufactured plastic parts are clean, there will be no problem with the operation of the mold. Only when the residues accumulated in the mold have an impact on the quality of parts or the mold is worn, the mold needs to be cleaned, and the cleaning process only needs to be carried out.
For the cleaning and repair of molds, some factories mainly employ some interns in machinists or mold factories to clean molds and stainless steel, and then molds and stainless steel are divided by service technicians. However, in fact, through the cleaning of molds and templates, the tracking marks will also be washed away. It is difficult for maintenance technicians to find the defects of molds and parts and repair them correctly.
In fact, the cleaning of the mold does not require the talents of senior mold making technicians, but for newcomers who are not familiar with the special functions and disadvantages of the mold, or whose characteristics in the important sealing field of the mold are unknown, they have no responsibility for mold cleaning at all. Please decide. The improper distribution of mold cleaning operations leads to the continuous production of molds with performance defects. In addition, it will increase significantly due to the increase of joints, burrs, corners, early electroplating or steel movement, and mold mixing. The problem of mold budget often comes from the conservative culture of “temporary fire extinguishing”, which will never monitor or explain defects and find out the root cause of the problem.
Standardized Cleaning Procedures
Systematic mold maintenance is based on the consistency of maintenance requirements and maintenance operations. In order to achieve the goal of “high cost to effect”, mold cleaning needs to be carried out carefully. Develop detailed mold cleaning procedures.. When various parts of the mold are cleaned by stamping internal cleaning, edge wiping, general cleaning and main cleaning, the cleaning operation methods are also different.
After a certain period of operation of the mold and after visual inspection of coating wear, track marks and mold residue content in the ventilated and non ventilated fields, technicians can determine the sequence and frequency of mold cleaning through visual inspection. Therefore, it is important to understand the safe operation cycle of the mold and document the observation results of residual residue and wear in the mould.
According to the molds with specific operation cycle, all molds shall be attached with records of relevant maintenance steps and maintenance intervals. Generally speaking, controlling the internal grease level and gear broach, sliding block, internal shaft pin and bushing and other movable parts are the key to ensure stable production. Other main causes affecting production include pollution and blockage of water pipeline and sprinkler, leakage of manifold, rust and corrosion caused by water leakage and condensation, etc.
How Clean Is Enough?
Generally, after the molding process is completed, it tends to leave dirt or residues on the mold. The final cleaning conditions vary according to the type of residue. PVC and other resins produce hydrogen chloride gas, which may corrode many kinds of mold steel. Other residues are separated from flame retardants and antioxidants, which may cause corrosion to steel. It is also possible that the pigment colorant of rusty steel is difficult to remove rust. Even ordinary sealing water will cause damage to the mold if it is placed on the untreated mold surface for a long time.
Therefore, the mold must be cleaned as needed according to the established manufacturing cycle. Every time the mold is removed from the press, the vent hole of the mold must be opened to remove all oxidizing dirt and rust from the mould and the unimportant part of stainless steel, so as to avoid the slow corrosion of the steel surface and edge. In most cases, even after cleaning, rust will appear immediately on the surface of the mold that is easy to rust without coating. Therefore, even if it takes a long time to grind the unprotected mold, the surface rust can not be completely avoided.
How To Clean Die Casting Mould – Step By Step Guide For Cleaning Die Casting Mold
The following is the operating procedures for die casting mold cleaning.
1. Hoisting requirements
The installation and disassembly of the mold shall be carried out in strict accordance with the “operating procedures for mold setters”. When using the crane, ensure that the lifting electric hoist is directly above the mold (the inclination is within 5 degrees). It is strictly prohibited to lift the mold obliquely, resulting in damage to the mold cavity, water pipe, joint, shunt cone, core and other functional components.
2. Cleaning tool selection
Choose different cleaning tools according to different cleaning parts. Copper brush, copper shovel, stainless steel belt brush (steel brush is prohibited) and brush for mold cavity; Steel brush, steel shovel, copper brush, rag and brush shall be used for formwork and other institutional parts; Water pipes, wires, plugs and sockets, limit switches, etc. use brushes and rags.
3. Preparation before cleaning
Before cleaning, the inlet and outlet of the mold water pipe, oil pipe and gas pipe shall be blocked with a rag or the outlet shall face down to prevent the entry of aluminum slag and polluting sundries during cleaning. Travel switch, plug, etc. shall seal the inlet and outlet holes of each wire to prevent short circuit and leakage caused by the entry of conductive liquid.
4. Cleaning
Removal: remove the mold with corresponding tools, and follow the top-down principle to remove all aluminum slag, oil stain, dust and other dirt on the mold. Pay attention not to bump and scratch the cavity, core and other product parts.
Cleaning: ① first clean the mold with kerosene to ensure that there is no aluminum slag, dust and dirt at the places easy to hide and accept dirt such as right angle groove holes, and the appearance of sliding parts such as parting surface, cavity and core pulling and the mold is clean as new. ② after that,blow dry the mold with compressed air,especially to ensure that the travel switch and plug are dry and free of oil accumulation. ③ Carefully check all parts of the mold according to item 5 8-1 standard, and timely transfer the defective parts to the mold maintenance area for maintenance. ④ If there is no problem, the mold shall be hoisted to the maintenance area, and the guide post, guide sleeve, cavity, parting surface and sliding parts of each part shall be coated with anti rust oil. ⑤ Finally, hoist it to the “mold storage area” for fixed location and storage, and fill in the mold loading, unloading, repair and maintenance card.
5. Inspection during cleaning
Check the product department: ① whether the cavity and slider core stick to aluminum, crack, collapse, deformation and collapse. ② Whether the core is broken, bent, aluminum stuck, broken, etc; ③ Whether the exhaust duct is blocked and aluminum adheres. ④ Whether the internal pouring products are cracked and thickened.
Check the mechanism Department: ① whether the parting surface adheres to aluminum and collapses. ② Whether the oil pipe and water pipe are leaking and blocked. ③ Whether the ejector rod is broken, bent or broken. ④ Whether the reset rod is shaped and the length is consistent. ⑤ Whether the slider moves in place, stuck and freely. ⑥ Whether the bolts of ejector plate, mold base and limit block are loose. ⑦ Whether the guide post and guide sleeve are deformed, cracked, excessively worn and loose. ⑧ Whether the wiring is torn or disconnected. Check whether the travel switch and plug are filled with water, and whether each contact of the travel switch is sensitive and normal. ⑨ whether the lifting ring has cracks and excessive wear.
6.The repaired mold core or core and mold base must be cleaned and wiped before assembly.
7.The cleaned molds shall be hoisted to the maintenance area for spot inspection and polishing. After repairing, maintaining and oiling the damaged parts such as damaged and broken cores and ejector rods, the moving and fixed molds shall be hoisted to the mold storage area after clamping.